Home-made Christmas Stuffing

FRIDAY, DECEMBER 25TH, 2009

3.5 stars (out of 5 - good, but a bit mushy after I left it for too long!)

Silly me! I went to make my Christmas dinner (veggies, mashed potatoes, turkey rolls with stuffing) and realized that I had forgotten to buy the stuffing! With the stores closed, I resorted to measures seen only in previous generations: I made my own from scratch. It actually turned out well!

Ingredients:

4 cups bread crumbs (stale - leave out overnight)
1/2 cup melted butter
1/2 tsp salt
2 tsp thyme (to taste)
1/2 onion, finely chopped
1/2 - 1 cup chopped celery

1. First, I broke the bread pieces up into small bite-sized pieces...


2. ...and added them to a large bowl. You can then leave them out for the day, to make them stale.


3. Because I hadn't planned ahead, I didn't have the opportunity to leave my breadcrumbs out overnight (or during the day), so I simply baked them in the oven at 350F for about 3-5 minutes (check on it - our oven takes longer to do things than most!). When they were a bit crispy, I took them out and let them cool.


4. I heated the butter on medium heat until it was all melted, and then added the onion and celery.


5. I then stirred everything together and cooked for about 8 minutes.


6. After the celery was tender and everything was mixed together well in the pan, I removed it from the heat, added the bread crumbs, and stirred well.


7. I then greased a shallow casserole dish, and added the stuffing (about 1-2 inches thick), covered it with foil, and cooked it for 25 minutes. You can serve it right away or leave it for a while.


In the end, it turned out very well. The only suggestion I have is to eat it right away. I left my off to the side for a while and it got pretty mushy. I really like the crisper pieces that were on top of the casserole dish. Next time!

SB's Christmas Eve Dinner (pics only)

THURSDAY, DECEMBER 24TH, 2010

I was so impressed with SB's delicious Christmas dinner, so I wanted to post some pics. He's the one that should have the blog!

We dined on soup, a delicious vegetable pastry, and roulade... followed by my favourite SB-made brownies (I might post the recipe to those sometime soon).

Spring Vegetable Boxes with Pernod Sauce:


Sweet Potato Roulade (my favourite!):

Spinach-Ricotta Stuffed Pasta Shells

TUESDAY, DECEMBER 22ND, 2009

4 stars (out of 5 - amazing sauce, okay filling)

During our week off before Christmas, SB and I decided to try out a few new recipes. This one looked different, and we liked the idea of the tapenade-tomato sauce. In the end it really was quite good, but a bit complex to make (not difficult, just many different things to prepare).

Ingredients:

350g large conchiglie (large pasta shells)
1 pack frozen spinach, thawed and drained
1-2 cloves garlic
4 tbsp olive oil
1 large can crushed tomatoes
50g crustless white bread, crumbled
1/2 cup milk
2 1/4 cups ricotta cheese
Pinch of ground nutmeg
1/3 cup tapenade*
1/4 cup grated Parmesan cheese

{*Note. We make our own tapenade, but you can just use store-bought. If you don't have any on hand, you can skip it, but I really recommend trying it. I will try to post our (super simple) recipe for home-made tapenade soon, and will post the link here when I do.}

1. We first boiled the water for the pasta (as per the instructions on the box). Once it was cooked, we drained it, ran it under cold water (to prevent further cooking), and set it aside.


2. In a small food processor/chopper, we then added the bread...


3. ...milk...


4. ...and 3 tbsp of the olive oil...


5. ...and blended until smooth.


6. We then added the ricotta cheese, and seasoned with the salt, pepper, and nutmeg, again blending the mixture well.


7. Next, we added the chopped spinach. Because our food processor is so small, we had to gradually add the spinach, which made for a funny green colour halfway through (second pic).


8. The final mixture, which we set aside until the tomato sauce was prepared:


9. We then turned our attention to the tomato sauce, mixing together the crushed tomatoes...


10. ...tapenade...


11. ...remaining oil...


12. ...and the minced garlic...


13. ...and stirred the mixture well.


14. We then spread the tomato sauce on the bottom of a medium-sized casserole dish. You should use a large one if it fits in your oven - ours doesn't and we had a bunch of leftovers that needed to be cooked later :(


15. After spreading out the tomato sauce, we then (gently) opened the shells and stuffed them with the spinach mixture (not too much)...


16. ... and placed them in the casserole dish on top of the tomato sauce.


In the end, we tried to squish in as many as we could!


15. We then sprinkled with the Parmesan cheese and cooked at 350F for 15 minutes (until heated through). You may also want to add toasted pine nuts.


Overall, this was quite a good dish, although it was really the tomato-tapenade mixture that made it delicious. I really loved the tomato sauce and will probably do it again for other pasta dishes. The spinach filling was okay, but could use some more salt and flavour... somehow. Any ideas?! We will definitely be trying this one again!

Fresh, Home-made Pasta (Fettucine)

MONDAY, DECEMBER 21ST, 2009

4 stars (out of 5 - delicious but a time-consuming process!)

When we returned from Italy last year, we went into a total pasta withdrawal and craved the home-made fresh pasta that we had been living off of for the previous three weeks. We decided to buy a pasta-maker and try it out ourselves. Now we're addicted!

Ingredients:

2 cups all-purpose flour*
4 eggs (large)
1 tbsp olive oil
Pasta machine**

{*Note. You will also need some extra flour for the rolling process... perhaps another 1/2 cup at most}.

(**Note. If you do not have a pasta machine, you can cut the pasta with a knife, although this will probably make an already time-consuming process even longer, so I don't know if I would recommend it!}.

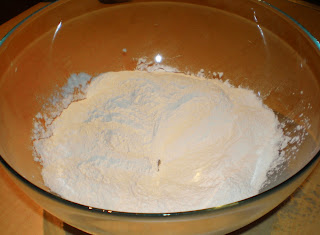
1. First, we measured the flour into a medium-large bowl. Although you are supposed to sift the flour first, we are always too lazy, and it turns out well, regardless. You want to then hollow out a little hole in the middle of the mound of flour.


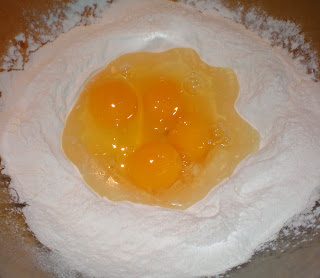
2. We then added the eggs to the dipped area of the flour.


3. We then stirred the mixture in the bowl, until it was all mixed into a dough (this becomes quite tough and you need good arm muscles!!). With our hands, we then kneaded the dough (adding flour as we needed when it became too sticky) until it was a fairly evenly kneaded, and pretty dry ball.


4. When it looks like the picture below, we then wrapped it in Saran wrap and placed it in the fridge for about 10 minutes.


5. After it had set in the fridge, we started to roll out the dough. Use a lot of flour here so that it doesn't stick. Also, the dough needs to be pretty dry to be able to go through the pasta machine without a mess.


6. Along the way, we made it into an elongated shape, so that it would fit through the pasta machine. You can see the width of the pasta machine in the third pic below.


7. Once it was about the right shape and about 1/2 inch thick, it was ready to go through the machine. However, because the machine elongates the dough so much, we first cut it in half!


8. We then put it through the pasta machine on the largest setting ("7" in our case).


9. We then kept putting it through the pasta machine on a subsequently lower setting each time ("6" then "5" etc.). At some point it will become very long again and you will need to cut it. Please remember to keep adding flour to each step. If your dough becomes too sticky, it becomes very tricky not to make a mess.


10. Finally, we finished on the "4" setting. This is for very thick noodles, which we like. However, you may find that a "3" or a "2" works better for you.


11. Once it was at the desired thickness, we put it through the other side of the machine, which cuts the pasta. It's a good idea to have a clean plate waiting for the pasta on the other end.

Justify Full
12. This is how it looks on the plate. We have found that it separates it pretty well, but that there is always 2 noodles stuck together which you have to separate by hand (pretty easily if you have added enough flour along the way).


13. We then piled the separated pasta on another plate. Because it can become so compacted, make sure to add more flour at this point so that they don't stick together, and fluff the noodles up once and a while.


14. We then just added them to a pot of boiling water for about 2 minutes (for VERY al dante... 3 for less so, depending on the thickness). Serve it then with some of you favourite pasta sauce.


Here is SB's served with his mom's great salmon recipe (http://etryingtocook.blogspot.com/2009/06/salmon-dinner-guest-recipe-merci-eliane.html):


Overall, the home-made pasta is a great treat. I can't really comment on the effort (although I know it is pretty time-consuming), since SB really takes care of the majority of it, with me as his assistant. I don't know if my arms could handle it! It's a bit of trial and error to find the right thickness and cook-ness for yourself. One other warning: after getting used to home-made pasta, it's hard to go back to the store-bought!! Now, we have to find a great home-made pasta sauce recipe... sigh.