Salmon Dinner - Guest Recipe (merci à Eliane et Francois!)

MAY 23RD, 2009

The folks were in town and my mom and I decided that it would fantastic to cook something great from France. SB's mom kindly sent us this delicious salmon recipe and instructions below!

For Eliane's Salmon you will need:

1 piece of boneless salmon with skin
1 tbsp or so of thyme
1 lauriers leaf
1-2 tbsp chopped white onion*
1/4 cup sour cream
Lemon
Parsley

*{Note. In a hurry up to the cabin (where this meal was cooked), I totally forgot to print the recipe so I didn't put the white onions :( Next time!}

1. First, on the skinless side, we sprinkled some salt & pepper, thyme, and pieces of the laurier leaf. You would also add the white onion here.

2. Next, we quickly (!) turned the fish over so that the skin is facing upward. The great thing about this recipe is that (besides being easy, simple, and delicious), the skin protects the meat from drying out.
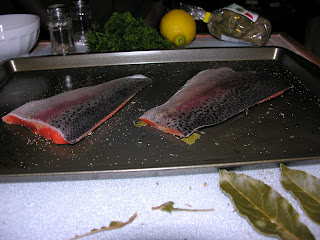


3. We then placed it into the oven at 430°F. We only cooked it for 15 minutes because the pieces were so thin. Keep an eye on it starting at about 15 minutes, and cook according to size.

4. When the salmon was cooked, we (well, SB) removed the skin (which was quite easy).


5. There may also be dark meat under the skin, which you remove with a fork.


6. Next, we cut the lemon in half and prepared the sour cream and lemon juice.


7. We mixed the sour cream, lemon juice and parsley in a bowl for a cold sauce. You want to do this right at the end so that it doesn't separate.


8. We then spread this sauce on the fish...


9. ... et voila!


We ended up serving it with a salad and asparagus, but it is recommended having it over a bed of rice. I will do that next time!!


Overall, even though I had a lot of help with this (thanks to SB and the Mama), it was so easy and very delicious. It took a total of 30 minutes (max.) with prep so I think it will be perfect during the week when I come home from school. I will definitely do it again!

{Merci à Eliane et Francois pour la recette et pour les photos!!)

Old School Falafel Pita

FRIDAY, MAY 8TH, 2009

3 stars (out of 5 - well, it's falafel! But with great sauce)

Today I decided that I would try an old school meal (with new, improved twists of course). I used to eat falafel all of the time during my early undergrad years, so I thought I would give it a try again. I was inspired by a great recipe (and accompanying pic) in a recipe book I recently discovered (okay, I've started watching too much Project Runway when I start talking about my cooking "inspirations"!). The sauce for the falafel wrap looked very appealing, so I thought I would try to "make it work".

Ingredients:

1 package falafel*
Oil (to cook)

1 medium avacodo*
1 medium tomato
1/2 cup mayo
1 tsp lemon juice
1/4 cup red onion (to your taste)
Chopped lettuce
Large pitas*

*{Note. For two wraps worth of falafel, add 1/2 cup cold water to 1 cup of falafel. It was only me tonight, so I halved the recipe, which made enough for two wraps. I also bought medium pita pockets by accident (see adaptation below), but really recommend large pitas if you want everything to fit inside!}

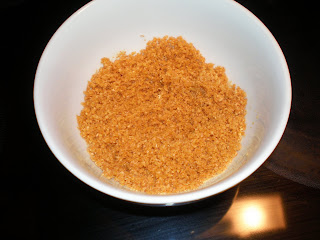
1. First, I added the falafel and water (according to the package), and let it set for 10 minutes.


After 10 minutes, this should be about the consistency:


2. As it was setting, I "smooshed" the avacodo in a medium bowl.


3. I then added the lemon juice and mayo, and stirred everything until it was fairly smooth.


4. I then added the coursely choopped tomato, and the finely chopped red onion.


5. I stirred everything together very well.


6. As I was mixing everything up, I heated some oil in a frying pan over medium heat. It was so much oil! I basically had to coat the pan.

7. I then added the falafel balls to the hot oil. I tried to make them fairly small, as they tend to get dry in the centre.


8. After they cooked for about 3 minutes, I flipped them over and cooked them on the other side. Note, it is not recommended to flip over your falafel after you have just washed (and not dried) your hands. Apparently the oil/water combo doesn't mix so well and you end up with burns (and oil) all over. Pleasant.


9. I then placed the falafel balls on a paper towel to try to absorb some of the oil. It's kinda gross how much oil was absorbed from the pan.


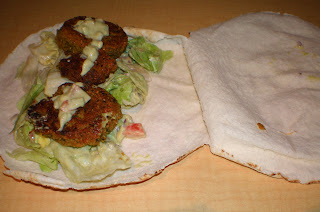
10. I had bought pita pockets, and they weren't big enough, so I opened up the pocket and then used it as a giant roll. I first spread some of the avacodo/mayo mix on it (quite thick... it tastes good!).


11. I then added some chopped lettuce...


12. ... topped by the falafel (and extra sauce for good measure).


13. I rolled everything up and hoped for the best!


Overall, I enjoyed the flavour of falafel, but it's just so greasy that I felt kinda bad/gross about eating it. I guess it's nice once in a while. However, I really liked the avacodo spread and thought it was a fantastic compliment to the falafel (and am wondering what else I could pair it with...).

Baked Chicken in White Wine Sauce

THURSDAY, MAY 7, 2009

4.5 stars (out of 5 - delicious and super easy!)

Tonight MK is coming for dinner and I really want to make him a good, home-cooked meal. I decided on this recipe because I have made it a few times (and therefore know it's safe!), is simple, and cooks for an hour, which leaves me free to do other things (such as clean up) in the meanwhile.

Ingredients:

~4 chicken breasts (original recipe calls for 4-6)*
1 can cream of mushroom soup
2/3 of a can of dry white wine
2 gloves of garlic
A small handful of grated Asiago cheese on top of each chicken breast*

~1-1.5 cups of crushed cornflakes
2-4 tbsp butter, melted*

*{Note. The original recipe calls for 4-6 chicken breasts placed in a 9X13 pan. I usually do 2 chicken breasts in a very small baking pan

1. First, I added the 2 garlic cloves to the mixing bowl.

2. I then added the mushroom soup, and used the can to also add 2/3 can of white wine, and seasoned with pepper. I actually did this step earlier in the day, and then refridgerated everything until it was ready to cook.


3. In the meanwhile, I melted the butter and added it to the crushed cornflakes until I had the consistency here:


4. I greased the baking sheets, and added the 2 chicken breasts to one, and the chick'n tenders to the other.


5. I placed a handfull of shredded cheese to the top of each.


6. I then very gently spooned the mixture over top of the chicken- you do not want the cheese to fall off, but you also want to make sure that the chicken breasts are coated. I then topped each chicken breast with the cornflakes.


For the simulated chicken, I coated it more like a casserole.


7. I placed it in the oven at 350F for 1 hour (or until the chicken is cooked). The other great thing about this recipe (besides being delicious) is that if you are not totally ready to eat it after an hour (say you have other dishes still cooking), you can cook it up to an additional 10 minutes and it will still be good. At least that's what I have done!

Here is the veggie one: {the other pic didn't turn out :(}


I served it with sour cream mashed potatoes and asparagus. I guess the only problem with the dish is that it doesn't look so great on the plate as it does not have a very neat, clean presentation (therefore, no pic!).

Home-made Salsa stuffed Omelette

SUNDAY, MAY 3RD, 2009

3.5 stars (out of 5 - pretty good)

We wanted to try something different for breakfast today, so we decided on an omelette with lots of stuffing (I don't like things that are too "eggy"). This recipe was from a book I just recently discovered on my bookshelf.

Ingredients:

Omelette:

4 eggs
1/3 cup of milk

Salsa:

3 fairly ripe tomatoes
1 avacodo
1/4 cup loosely packed chopped cilantro (reduce if you don't want it too strong)
1/3 cup chopped red onion
1 clove garlic
2 tbsp lime juice

1. First, I coursely chopped the tomatoes and cilantro added them to a medium sized bowl. As I was making it, SB informed me that he doesn't care too much for cilantro (great!), so I really reduced the amount. It still had a lot of flavour, so unless you absolutely love love love cilantro, I would reduce it to a little less than the said amount.


2. I then added the garlic, red onion, and lime juice, and mixed it all up. You can prepare this part all ahead of time, but make sure that you only do Step 3 right before serving.


3. I then added the chopped avacodo to finish the salsa.


4. While the salsa was being mixed, SB mixed up the eggs and milk into a bowl.


5. He then separated the mixture in order to make two omelettes, and fried them, very thin in a frying pan.


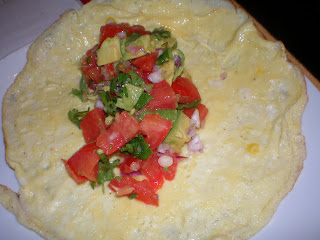
6. After they were cooked, we added the salsa to the omelette.


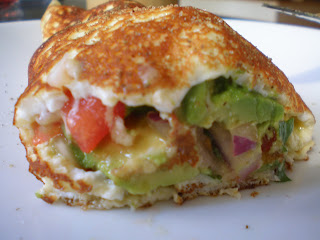
7. We then very carefully rolled them up.


Overall, it was a refreshing change. I don't like really eggy omelettes, so it was ideal for me. However, I think the salsa, served at a party with some chips might be a better way to enjoy it. It was almost more of a dinner omelette (if such a thing exists). You also have to be careful, because so many people don't like cilantro, and it's really what gives the salsa its flavour in this recipe.