Coq Au Vin

SUNDAY, AUGUST 22ND, 2010

5 stars (out of 5 - delicious and pretty stress-free!)

I wanted to try out the new slow-cooker cookbook that I just received from MM, and this recipe stood out. I decided to make it Sunday morning, as it needed to cook for 7-8 hours. I think I might have attempted a recipe similar to this before (the smell reminded me of something)... so hopefully it turns out! I am also really into trying to find a great slow-cooker recipe that I could serve to guests with confidence. This recipe was from the Company's Coming Most Loved Slow Cooker Creations book; I really like their recipes, as they are usually pretty simple and almost always turn out well (unlike some other companies, I think Company's Coming actually tests their recipes out! Imagine that).

Ingredients:

6 slices of bacon, diced
1/4 cup (60 mL) flour
1/4 tsp. (1 mL) paprika
6 chicken thighs (bonelss, skinless)*
1 pack (up to 4 cups) white mushrooms, halved
1 cup (250 mL) chopped onion
1-2 garlic cloves, minced
1 can condensed cream of mushroom soup
1/2 cup (125 mL) dry red wine
1/2 cup (125 mL) prepared chicken broth
1/2 tsp (2 mL) dry thyme

{*Note. The original recipe calls for 12 chicken thighs. I did two, but I think I would comfortably do up to six. Any more than that, I am not sure how I would fit them into the slow-cooker!}.

My new cookbook stand:


1. First I cooked the bacon on medium heat, until it was crisp. I then removed the bacon and diced it up.


2. While it was cooking, I added the flour and the paprika to a Ziploc bag, and added the chicken to coat it.


3. After the bacon was removed from the pan, I added the chicken, using the bacon drippings as oil. I cooked it for about 8 minutes, just so that it was brown on all sides.


4. As the chicken cooked, I prepared the other ingredients, by chopping up the onion, and slicing the mushrooms in half.


5. When the chicken was ready, I removed it from the pan and placed it in the slow-cooker.

6. I then added the mushrooms, onion, and garlic to the same frying pan, and sautéed for about 2 minutes.


7. Once the onions had softened, I added the mushroom soup, chicken broth, wine, and thyme to the pan, and brought it to a boil.


8. Once it was boiling, I poured it over the chicken, covered the slow-cooker, and placed it on "Low" for 7-8 hours (or on "High" for 3.5-4 hours).


Final Product:


Overall, this was a delicious meal, and SB loved it. It took a bit of time to prepare before throwing into the slow-cooker, but was well worth it. I look forward to serving it to guests - I especially love doing slow-cooker meals when having people over because it means I don't have to cook and visit at the same time (I am so bad at doing this!) and the house smells so great. One note: I would combine the cream of mushroom soup and the wine/broth together prior to adding it to the pan. It took a while to get the lumps out, and my frying pan isn't so deep, so I spilled a lot in the process. Other from that, this recipe is pretty straight forward, and easy to do.
Isabelle's Guacamole

SATURDAY, AUGUST 21ST, 2010

First wedding recipe! We were having fajitas, and love love love them with guacamole, so I thought it would be a great opportunity to try out one of the recipes that Isabelle contributed to my wedding cookbook.

Ingredients:

3 avocados, halved, seeded and peeled*
1 lime, juiced
1/2 tsp salt
1/2 tsp ground pepper
1/2 tsp ground cumin
1/2 tsp cayenne
1/2 medium red onion, diced
2 tomatoes, seeded and diced*
1 tbsp chopped cilantro*
1 clove garlic, minced

{Note. Because it was only for SB and me, I only added 2 avocados and 1 tomato. Unfortunately, the grocery store did not have fresh cilantro, so I did not add it to the guacamole. Next time!}.

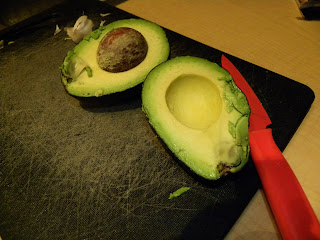
1. First I cut up the avocado, and removed the pit.


2. I then mashed the avocados in a medium bowl, until it was fairly smooth (thank you for the tip about the potato masher - much easier than a fork!).


3. I then added the salt, pepper, cumin, and cayenne, and mashed them up again.


4. I then folded in the tomatoes, onions, and garlic (here you would add the cilantro)...


5. ... and added the lime juice.

6. We ate it right away, but it if you are going to serve it on it's own, refrigerate it for a few hours in order for it to cool.


This guacamole was absolutely delicious. Both SB and I loved it. The tomatoes are such a great idea, as they add a bit of freshness to it, and the mix of the other flavours was great. Thank you very much, Isabelle, for this great recipe! I can't wait to make it again.

Tomato-Spinach-Dill Quiche w/ Potato Crust

FRIDAY, AUGUST 20TH, 2010

4 stars (out of 5)

I found this recipe on the same blog as the salad from the previous entry for the spinach salad (http://fortheloveofcooking-recipes.blogspot.com/2010/06/tomato-spinach-and-dill-quiche-with.html). The blogger looks like she has some pretty good recipes on there. This one appealed to me because I thought that the shredded potato pie crust was funny, and also because I haven't made a quiche for a long time (oh, and I was craving dill!).

Ingredients:

1 package of shredded hashbrown potatoes*
Garlic powder (optional)
1 tomato, diced
1/2 cup fresh spinach, chopped
2 tbsp red onion
2 tsp dry dill**
1/4 cup feta cheese
7 large eggs
1/4 cup milk
Salt & pepper
Olive oil

{*Note. Available at IGA. In the original recipe, she actually grated the potatoes herself. I don't really have the time, nor the patience to do this, so I "cheated" and just bought the pre-shredded version. If you have a nice evening that you would like do it from scratch, I recommend looking at her blog. But, if you're like me, you would much prefer to sip on a glass of wine and read a book than stand around shredding potatoes.}.

{**Note. I also added about 2-3 tbsp of fresh dill, and really recommend doing this. Even with this much dill, I think it could have used some more!}.


Preheat oven to 375F.

1. First, I patted the shredded potatoes dry, and spread them in a pie dish. I pressed them down fairly hard and then sprinkled with salt, pepper, and garlic powder to taste. I then placed it in the oven for about 12-14 minutes. It's not very finicky on this count - you can leave it in for a bit longer without it burning (which I did as I prepared the other ingredients).


2. As the pie crust was cooking, I crumbled the feta, diced the tomato, sliced the spinach, and chopped the red onion.


3. I then beat the eggs, milk, and dill together in a separate bowl.


4. When everything was prepped, I removed the pie crust from the oven, and added the tomato, spinach, red onion, and 1/2 the feta cheese.


5. I then poured the egg mixture over top, and sprinkled on the remaining feta cheese.


6. I popped it in the oven for an additional 30-40 minutes, and let it stand for a few minutes before serving.


Overall, this was pretty simple to make, and very stress free. I originally searched for it because I was craving something fairly healthy which had dill in it. I think that the dill could either be increased, or I could have added more salt, which would have made the dill flavour pop more. One note, I would make the potato crust very very thin, or even mix some flavours right into it before setting it in the pie place. Surprisingly, it did make a very good, sturdy crust (and simple!), which I was pleased to see. I will make this recipe again (leftovers were even good for breaky the next day!), probably just adding more dill and salt. SB really liked it, and it was a nice change from our other meals.

Post- Wedding Update

FRIDAY, AUGUST 20TH, 2010

Update: After an intense past couple of months (wedding, B.C., finishing the internship, Italy, B.C. again...), I am ready to get back in the kitchen! I have a bunch of new recipes to try out, and a great new cookbook to explore (thank you to my amazing friends for their thoughtful contributions). I am planning on making every recipe in the book, and if you were the one who contributed it, I will send you the link. As I mentioned in the previous post, I am also very excited to try out my new kitchen gadgets, and have selected some recipes for the next week that will ensure this happens. Now into the kitchen....!

Strawberry Spinach Salad w/ Poppyseed Dressing

FRIDAY, AUGUST 20TH, 2010

In an attempt to get back to our post-vacation "health", I decided to try to make salads a more interesting part of our meal. There are so many good ones out there that are super simple, and very yummy. I came across a blog which had this recipe (http://fortheloveofcooking-recipes.blogspot.com/2010/06/strawberry-spinach-salad-with-poppy.html). I decided to try it out, with my own modifications.

Ingredients:

Salad:

Baby spinach
Strawberries
Green onion
Goat cheese (optional

Dressing:

1/4 c. white wine vinegar
1/3 c. vegetable oil
2 tsp. granulated sugar
1/4 tsp. dry mustard
1/8 tsp. salt
2 tsp. poppy seed


1. I first prepared the poppyseed dressing by combining the sugar, vinegar, salt, and mustard in a food processor, and processing for 20 seconds.


2. I then added the oil and blended on high for an additional 10 seconds.


3. I removed the dressing into a bowl, and stirred in the poppy seeds, and refrigerated until I needed to use it on the salad.


4. For the salad, I simply combined the spinach, sliced strawberries, green onion, and goat cheese (we had some left over in our fridge).


5. I just spooned the dressing over top as needed, but you could also combine and toss it all together.

Overall, this was a pretty good tasting salad. Hard to screw up! I would have liked if we had more goat cheese to add to it, as I felt it went well with the dressing and strawberries. Will definitely (try to remember to) do this again!

Orange & Dill Salmon - Grill Update

TUESDAY, JULY 13TH, 2010

We received a great new George Foreman Grill (the illustrious "G5") as a wedding gift, and decided to retry the Orange & Dill Salmon recipe (http://etryingtocook.blogspot.com/2010/05/orange-dill-salmon.html), using the grill instead of a frying pan. Below is the picture of how it turned out - the presentation was much better than with the frying pan, and it was faster/easier to cook as well (no flipping, just closed the lid). I am looking forward to trying out many other recipes in the future (along with our new KitchenAid mixer!!).

Orange & Dill Salmon

TUESDAY, MAY 11TH, 2010

4 stars (out of 5 - an easy salmon dish, with an interesting blend of flavours)

1 serving = ~209 calories.

I am really trying to get SB to eat more fish, less red meat which means that I am now trying to conquer my fear/disgust of cooking fish. I have a Company's Coming cookbook that has a lot of really good, yet really simple fish recipes, and this is another one of them. I decided to try it out today because I needed to make the marinade in the afternoon.

Ingredients:

1/2 cup (125 mL) orange juice
1/3 cup (75 mL) maple syrup
1/4 cup (60 mL) dry white wine
1/4 cup chopped fresh dill*
1 tbsp (15 mL) soy sauce
Up to 4 salmon steaks, ~2cm/1" thick, 113 g each**

{*Note. You can also use 1 tbsp of dill weed if you prefer. I used fresh dill and then sprinkled some dill weed over top for good measure}.

{**Note. I only cooked 1 salmon steak, but the recipe is for up to four}.


1. First, I combined the first 5 ingredients in the small bowl, and mixed well.


2. I then placed the salmon in the bowl, covered it, and stuck it in the fridge for up to 4 hours.


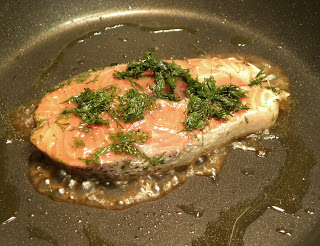
3. When I was ready to cook, I removed the salmon from the marinade (and discarded the leftover marinade), and fried it with some olive oil on medium heat in a non-stick pan for about 3-4 minutes per side (until it flaked away easily). The original recipe said to use an electric grill (or gas bbq to medium), and to cook it 5 minutes per side. I think I will have to get one of those!).


4. I served it with some baked asparagus (and a avocado-orange salad on the side - post to come!).


Overall, this was really easy to prepare ahead (the most time-consuming process was chopping up the dill, and it still only took about 5 minutes) and then just fry up when I was ready. SB said it was a really interesting mix of flavours with the maple, and that they blended together well. It was nice and moist and flaky inside. I might try this again with a grill. One note, SB kept adding the dill to the frying fish, which is why it blackened so much. I think that (presentation-wise) it might have looked better if we hadn't done that, or had used a grill instead.